✨Mod Organizer 2
We're using MO2 to install and manage mods. It's a more complicated tool BUT once you know it, you'll know how to mod plenty of games.
Mod Organizer 2 (MO2) is an essential tool for managing mods in Morrowind. To get started with MO2, it's recommended to watch a tutorial.
MO2 uses a Virtual Files folder, which is kept separate from your Morrowind installation. This means that all your mods are kept in a separate folder and when you launch the game, MO2 creates a virtual version of the Data Files with the mods that you have selected.
If you launch Morrowind without MO2, none of your mods installed with MO2 will appear. It's important to always start Morrowind through MO2.
With MO2, you can also create different profiles, which are different combinations of mods that you can switch between with just a couple of clicks.
Run the Mod Organizer 2.exe that you downloaded.
When prompted to choose an install location, choose your Morrowind Mods folder. It can be anywhere
When installation has finished, uncheck the option and click Finish.
Mod Organizer 2 initial setup
Run ModOrganizer.exe.
Mod Organizer 2 will prompt you to Create a new instance. Click Create a portable instance.
You will be asked to select a game to manage.
Click Browse... and select your Morrowind Root folder.
You will be asked to select a folder where data will be stored. The default MO2 folder is fine.
Click Next and then Finish. Mod Organizer 2 will now launch.
From the pop-up called Register?, click Yes. This will allow Mod Organizer 2 to handle Nexus links.
Say "no" to the tutorial, between the video and this guide you'll be fine.
Adjusting mod and load order
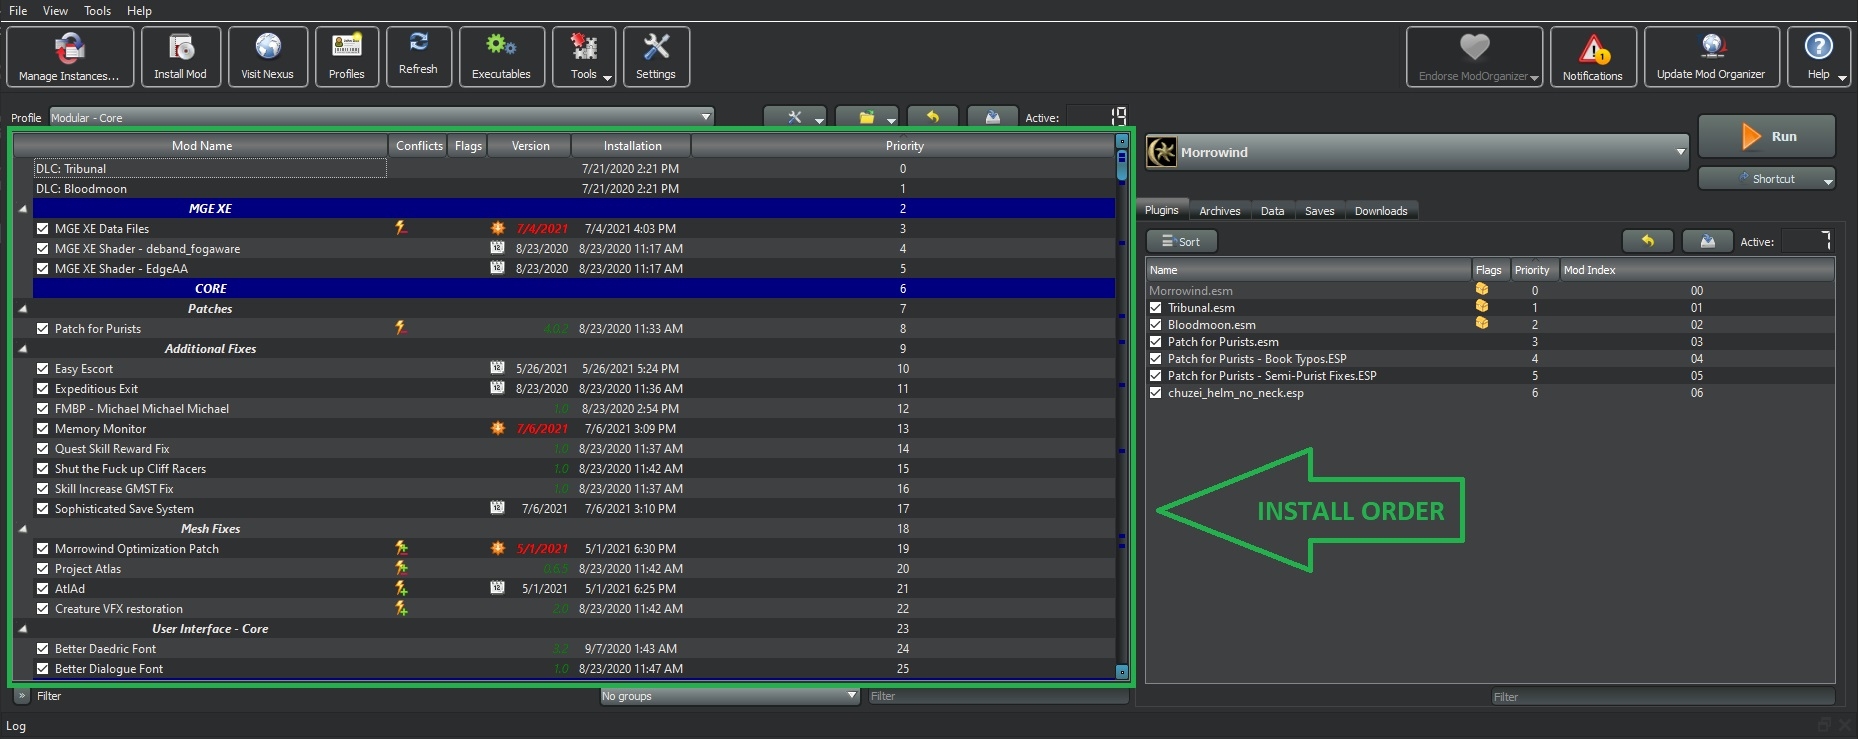
In the left pane, you can see all the installed mods listed in the order that Morrowind will load their assets, with mods at the bottom overwriting those at the top in case of conflicting assets.

Reorganize it to read as follows using drag and drop.
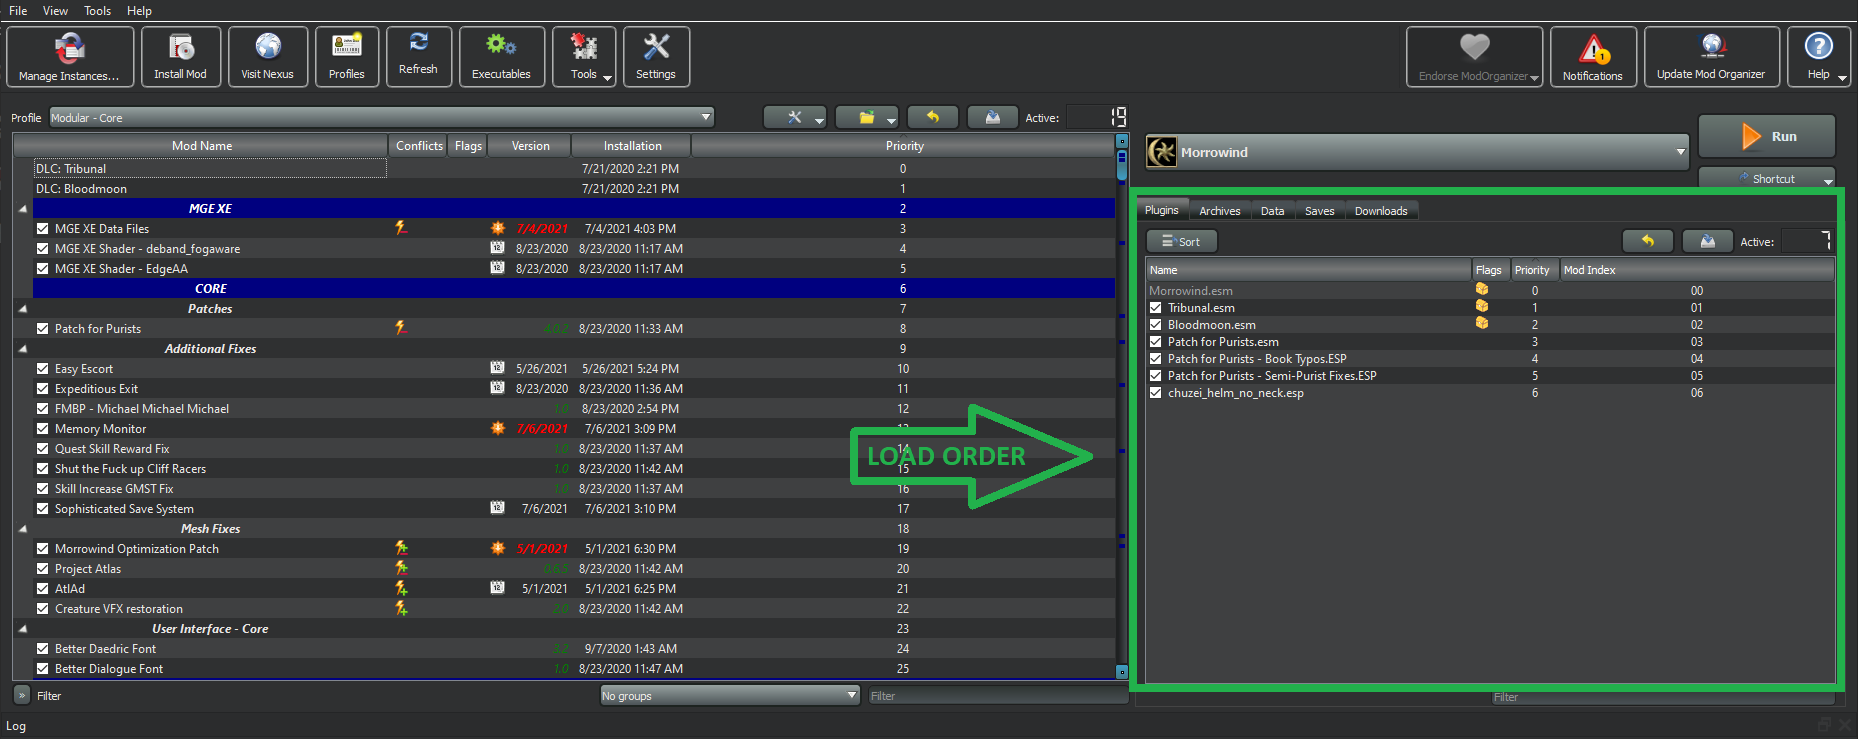
On the right pane, you can see all the plugins listed in the order that Morrowind will load them, with plugins at the bottom overwriting those at the top in case of conflicting records. While MO2 allows you to reorder plugins, it can be slow, especially with a large number of mods. To automatically sort your plugins, you can use Mlox or manually sort them using Wrye Mash.

Setting up Profiles
Mod Organizer 2 comes with a convenient feature called Profiles, which allows you to easily switch between different mod setups.

To create a new profile for our Morrowind setup:
Click the Configure profiles
button.
Check the following options:
With the Default profile selected, click Copy. Type in DLM and click OK. Close the window.
On the Profile tab, select the DLM profile.
It's a good idea to keep the default profile as it is, which serves as your vanilla install and baseline for future modding endeavours.
Registering tools in Mod Organizer 2
To ensure that our modding tools function correctly in Mod Organizer 2, we must register and configure them. The reason for this is the Virtual folder system we mentioned earlier, which requires that tools run through MO2 in order to affect the game when launched through MO2.
Click the Modify Executables
button.
In the Start In field, select your Morrowind Root folder
Morrowindfor every tool.
MLOX
Click the Add an executable
button and select Add from file....
Navigate to your Morrowind Root folder (
Morrowind) and double clickmlox.exe.Click Apply.
Wrye Mash
Click the Modify Executables
button.
Click the Add an executable
button and choose Add from file....
Navigate to Wrye Mash's folder
Morrowind\Mopyand double clickmash64.exe.Click Apply.
TES3Merge
Click the Modify Executables
button.
Click the Add an executable
button and choose Add from file....
Navigate to the folder
Morrowind/tes3mergeand double click itstes3merge.exefile.In the Start In field, select your Morrowind Root folder
Morrowind.Click Apply.
Click OK to close the window.
Exclusion rules:
Navigate to
Morrowind\TES3Merge\and openTES3Merge.iniwith a text editor.Find the section [FileFilters] and add the following:
MGE XE
Click the Add an executable
button and select Add from file....
Navigate to your Morrowind Root folder
Morrowindand double clickMGEXEgui.exe.
Click Apply.
MWSE-updater.exe is the only tool that you mustn't run from MO2, run it from your Morrowind folder or setup a shortcut where convenient. Also, run it often, like on a weekly basis.
Creating a separator (left pane)
Creating separators in MO2 is a great way to organize and manage your mods. Separators act as dividers in the mod list and make it easier to find specific mods or groups of mods.
right-click in the mod list pane and select "Create Separator."
name the separator and place it in the desired location within the list.
I recommend creating a separator for each mod category you plan to install, such as "Graphics," "Gameplay," "Quests," etc. This will make it easier to locate and manage your mods as your list grows.
Additionally, separators can be collapsed to keep your mod list clean and tidy. Simply click the arrow icon next to the separator name to collapse or expand it.

Adjusting Morrowind.ini with MO2
One of the patches we installed with the Morrowind Code Patch, Rain/snow collision, requires a few .ini edits to work properly.
Click the Tools button, and click INI Editor. morrowind.ini will now open.
Change the following lines
Click "Save" and close the window.
For a detailed explanation of these changes, check out Necrolesian's excellent guide.
Time to make sure Morrowind is working fine!
You could launch Morrowind from MO2...
BUT here's what I recommend:

Launch Wrye Mash through MO2.
Check the status of your plugins to ensure that everything is running smoothly (indicated by a green color).
Run Mlox if you've added mods
Clean up your saved game if you've changed your modlist
Start your game using the Morrowind icon in the bottom right corner
As you know, Morrowind does crash, sometimes. This means that if you start the game through MO2 and it crashes, you need to re-create the virtual folder again before launching the game.
However, if you start the game through Wrye Mash, the virtual folder will remain even if the game crashes because Wrye Mash is still open.
You can start your game again without having to go through the process of re-creating the virtual folder.
Last updated
